

Helpful "How To" Auto Restoration DIY Tips & Fitting Instructions
See below for helpful tips on how to install early Aussie-made Holden and Ford car parts from our extensive range. If you have any helpful DIY tips you'd like to share to help fellow Holden and Ford restorers, please send the details to info@aaapartssupply.com.au. If your tips are published to our website, you can receive a $50.00 store voucher!
Please note: all information submitted is not guaranteed to be published. For more information, contact the helpful and knowledgeable team at our Gold Coast warehouse.
Fitting instructions
- Rear window fitting instructions
- Bailey channel fitting instructions
- Boot rubber weatherstrip seal fitting instructions
- Car door seal repair and replace instructions
- How to install a speedometer cable
- Door lock knob fitting instructions (PDF)
- Fitting door aperture seals (PDF)
Fitting boot, hatch and van door seals
Tools: rubber mallet, superglue, scissors/shears.
- Pinchweld-type boot seals should be fitted as per door aperture seals, but take care to clean and remove all dirt and rust that accumulates under old boot seals.
- Be careful to fit the new seal so that it "rolls" toward the outside of the car as the boot lid is closed.
- Superglue the ends together once fitted.
- Extrusion-type boot seals are usually fitted to the boot lid, either glued or clipped. Follow the instructions as per door aperture seals.
Fitting door aperture seals
Tools: rubber mallet, side cutters or large scissors.
- Check the replacement seal is a similar type, size and length to the original.
- Position one end of the pinchweld at your selected start point and, using the palm of your hand or a rubber mallet, push it into place.
- Cut the new seal to length once it's in place, and superglue the two ends together.
- Useful tip: pinchwelds do shrink with age, so don't stretch them into place. Pack tightly into corners and leave surplus if possible, under the door scuff plates.
Door seal fitting instructions
EJ-EH-HD-HR-HK-HT-HG-HQ-HJ-HX-HZ-WB Holdens and LH-LX-UC Toranas. Before fitting these seals please read these instructions carefully:
- Check your seal to find where it is joined. In most cases the clips at this point are closer together than the rest — this is your starting point.
- In most cases your door will also have two holes closer together than the rest.
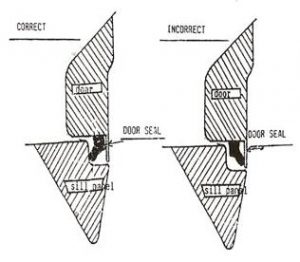
- Ensure you are fitting the seal the correct way as shown in the diagram below.
If you follow these three steps you should not have any problem fitting your seal.
Fitting door seals — universal instructions
Check the replacement seal is of the correct type, size and length. Please note this replacement seal may not be exactly the same profile as your original door rubber. Take careful note of the way your door seal fits to the door before removal, to ensure correct replacement.
- Pre-clipped type: start from the moulded or shaped corner and work around the door, cutting to length and making the join with superglue under the door.
- Holden/GM pre-clipped type: this is usually a one-piece seal, but look out for the two clips that are closer together, by the door catch. Start at this point.
- Channel and glue type: start at the corner, carefully pushing the rubber into place with your fingers or a blunt screwdriver (soapy water makes it easier). Begin gluing the new seal where the channel ends, work towards the bottom of the door, cut to length and join with superglue under the door.
- Useful tip: superglue is the quickest and cleanest method of fitting door seals, but always work in short lengths as it sets immediately and cannot be easily removed.
Watch: Car Restoration — Beginner's Guide to Dismantling Classic Car Doors
Fitting instructions for 2-door Monaro (HK-HT-HG-HQ-HJ-HX) roof rail seals
Note: do not cut the seal before fitting. Fit to the vehicle first, then cut the end to suit.
- HK-HT-HG Monaro — cutting is not required.
- HQ-HJ-HX Monaro — cutting is required, due to the quarter-panel horseshoe rubber meeting the end of the roof rail seal.
Bailey channel (glass run) fitting guide
Tools: screwdriver, small spanners/sockets, superglue or contact adhesive.
- Soft flocking type: check the replacement channel for fit and length before removing the old channel.
- Remove the inner door trim and loosen the window channel upright inside the door to allow clearance to fit the new channel.
- Take care to obtain a tight fit in all corners and superglue all joins to eliminate draughts and wind whistle.
- Rigid type: when fitting rigid window channel, as found in older Holdens and Fords, careful cutting and shaping is essential. All bending and shaping must be done with your thumbs, being careful to avoid the stainless steel beading crimping and pulling away from the channel.
Remember, less is more — gently does it. Many small bending efforts are far more successful than one quick, sharp bend. See also: fitting door seals — non-clipped (PDF).
